It’s the last day of my friandise special and we’re making chocolate bonbons! I’m using a new technique to personalize my bonbons and we’re filling them with a whiskey and tailed pepper pectin gel and a whiskey caramel ganache.
Whiskey & tailed pepper pectin gel
Servings 30 guests
Ingredients
- 200 g whiskey
- 1 g tailed pepper
- 10 g sugar
- 6 g pectin jaune
- 75 g sugar
Instructions
- Pour the whiskey into a pan, also add the tailed pepper and bring it to a boil. Meanwhile mix the 10 grams of sugar with the pectin jaune.
- Once the whiskey is boiling add the pectin sugar and while stirring let it boil for 3 minutes. Then add the sugar and keep on heating till the temperature is 104 °C (219 °F). Stir it every now and then to prevent it from burning.
- Once it’s done pour it into a bowl, cover it and let it cool down completely. I left it overnight so the flavors could really infuse.
- Then remove the tailed peppers and transfer it into a piping bag.
Whiskey caramel ganache
Servings 60 dishes
Ingredients
- 40 g sugar
- 20 g coffee beans
- 100 g cream 35% fat
- 50 g whiskey
- 400 g white chocolate 28%
- 5 g cacao butter
- 50 g butter 85%
- 50 g whiskey
Instructions
- First caramelize the sugar on a medium heat. Stir it as little as possible to prevent it from crystalizing.
- Once you’re happy with the color add the coffee beans and toast these for a minute.
- Then while stirring add the cream. Keep on mixing till all the caramel has dissolved. Then turn off the heat and add the first 50 grams of whiskey. Cover the pan with a lid and let it infuse overnight in your fridge.
- The next day you can take it out of the fridge and bring it to a boil. Meanwhile transfer the white chocolate into a bowl together with the cacao butter.
- Then pass the whiskey cream through a fine sieve onto the chocolate and also add the butter and the second 50 grams of whiskey.
- Now blend this till smooth and fully emulsified. If needed give it some more heat, but you should be fine. Then transfer it into a piping bag and keep it out of the fridge for later.
The chocolate shells
Instructions
- First we need to prepare the bonbon mold. Use a kitchen paper with a little bit of melted cacao butter to clean the mold. Then take a clean paper and whip out all the cacao butter.
- After that color some melted cacao butter with green fat soluble coloring powder and mix it well till all the powder has dissolved. If you’re having some trouble with dissolving use a hand blender.
- Now we need to temper it. For that pour it on your worktop and while moving cool the cacao butter down till it’s 31 °C (88 °F). Then transfer it into a brusher. You could use a sponge, but with a brusher you get a super nice even result.
- Brush a thin layer in the bonbon mold, do this outside or in a brush box. Once you’re happy with the brush clean the mold on some kitchen paper. Then let it set for at least 30 minutes.
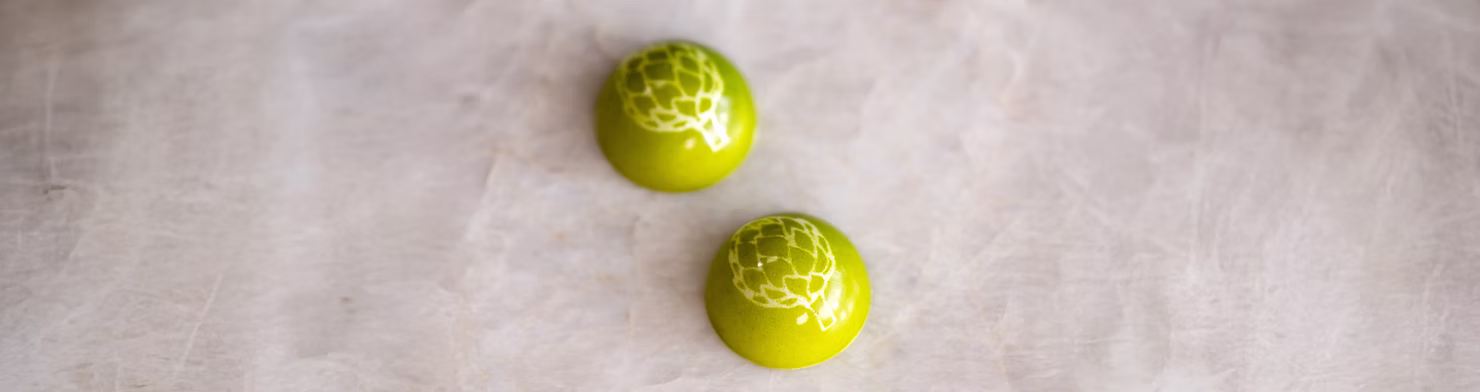
- Now we’re going to give these bonbons a little person touch. I already made multiple video’s on how to design your bonbons, but here I try a new technique with a stamp. I had this one custom made with my logo. You need to heat the stamp slightly and then melt the cacao butter for a second.
- Once it’s melted you can whip it away with a little sponge. The stamp I had made by Mold Brothers. Once you’re happy with the design we need to temper some white chocolate.
- I use some melted chocolate that’s 45 °C (113 °F). Pour 4/5 on your worktop and while moving it with a big pallet knife cool it down till it’s 27 °C (81 °F).
- Then transfer the chocolate back into the bowl and mix it well till it has a temperature of 30 °C (86 °F).
- Now fill your mold with the chocolate and tap it a couple of times to remove any air bubbles.
- Then turn it around and tap the side to remove any excess chocolate. The more you tap, the thinner the shell will be. Now use the pallet knife to clean the top. Off course you can reuse the excess chocolate.
- Then once the chocolate has set you can fill it with the fillings. First add a dot of the pectin gel and then fill it just below the edge with the ganache. Let this set for half an hour.
- After that take some tempered white chocolate and close the bonbons. Now take the big pallet knife and level the top. Then clean the sides and let it set for at least an hour.
- Once set turn the mold around and tap the bonbons out of the mold.
- If you have trouble unmolding the bonbons let them sit for a couple more hours and then gently twist the side of the mold. If this also doesn’t work pop them in the freezer for a couple of minutes and then let the mold sit for 1 hour on your worktop before removing the bonbons from the mold.


